Showing posts with label tutorial. Show all posts

Saturday, November 12, 2011

Hair bows

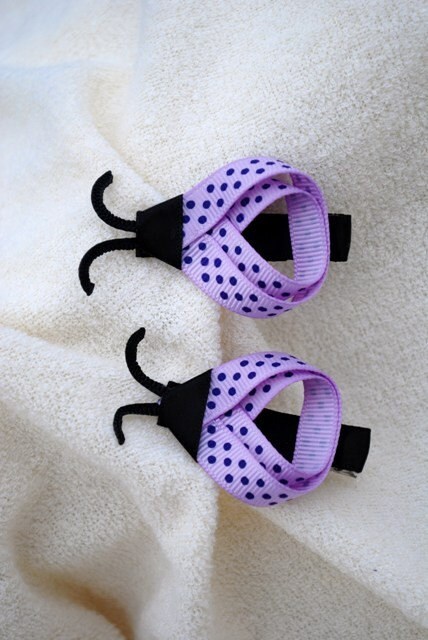
A while ago I made a birthday card with hairclips on it for a friend's daughter's birthday. Her other 2 girls have birthdays in November so I thought I would make them something similar.


These felt bows were really easy to make from a tutorial I found. Hairclips are so easy to make and make great little pressies, attached to cards or not. Here are some more tutorials I have found:


Have a go at making some, they really are quick and satisfying projects!

Saturday, October 8, 2011

Felt Cookies

This is the felt project that Mia has been nagging me to make, cookies! After finding inspiration from pictures on pinterest I decided I would make a "cookie baking" set, with the cookies cut out of "dough" and uncooked, and then the same cookies finished with icing and sprinkles so that she could pretend that she was completing the baking process.

Here is how to do it:

You will need: Light brown felt, medium brown felt, brown cotton, beads for sprinkles that can be sewn on, felt for icing (I used pale pink) and matching thread.

1. Cut out a "dough" shape from the light brown felt. Take 1 or more cookie cutters and trace around them onto the shape. Cut them out so that they can be removed from the dough. These are your unbaked cookies ready to go into the oven!


2. Cut out an icing shape for each completed cookie, using the cookie cutters. Cut out 2 medium brown felt shapes for each finished cookie, but make them bigger than the cutters as shown below. I did this because cookies get bigger when you cook them in the oven!

3. Sew the icing shape onto the top medium brown felt shape. Sew the sprinkle (beads) on. Sew the 2 medium brown shapes together for each cookie. They look yummy!

Yes there is a "well done" cookie on this plate, I ran out of the first colour of felt! And the strangely arranged sprinkles on one of the hearts are supposed to say "Mia"!


I don't think there will be too much KCWC sewing going on here today - baby up half the night and sick, tired Mummy! I will try to at least do something!

Thursday, October 6, 2011

Dolls' nappies (diapers)

KCWC turned a bit to custard at the end of the week as my overlocker ran out of thread and I haven't had a chance to buy some more yet! I have half finished matching dresses for my girls that I will share over the next few days when I finish them. Instead I found a couple of little projects that are not kids clothing, but still worthy of sharing I think. The first are very quick and simple felt nappies, the second is an owl tag toy that I am very happy with and will share tomorrow.

I love felt! Such an easy fabric to work with. No hemming and almost indestructible for kids! A really quick way to make nappies for dolls (or other toys) is to use felt. They won't fit perfectly or be streamlined under their clothes, but they are easy for little hands to put on and off and are very quick and easy to make.

You will need: Felt, hook and loop tape (also called "velcro" sometimes), thread

1. Firstly you will need to make a pattern for the toy that you are making the nappy for. I used some baking paper and kept trimming and extending it until it fitted "buba" the doll. Once you have the pattern you can use it over and over again. Your pattern should be shaped like this:


2. You then need to cut one of more outlines from felt from your pattern.


3. You then need to sew hook and loop tape onto your nappy as shown below. It doesn't really matter which goes where, hook or loop, just as long as you have both and don't use the same one in both places! You will need one kind in the centre and the other kinds on both the "arm" bits that stick out.


4. Put the nappy on the doll! It's as simple as that!


Felt Carrots

Today I wanted to do something quick to add to the felt food collection,so decided on carrots.

You will need: Orange felt, green felt, stuffing (I used wool) and orange thread

1. For each carrot cut out a matching front and back from orange. I made 4 carrots.


2. For each carrot you will need a square of green to make the greenery for the top out of.


3. Roll the square up and pin it closed.

4. Remember those paper trees you made when you were a kid? Well you need to do eaxctly the same to your roll of green felt, cut it down about three quarters of the way. Cut three equally spaced lines around your felt so that it fans out.


5. Place the greenery inside the carrot and pin around the outside.


6. Stitch around the edges with orange using the sewing machine and leaving a space to put stuffing into. Stuff it.


7. Hand stitch the opening closed with orange thread.

Monday, October 3, 2011

Felt animal mask tutorial

So here is another felt tutorial, but it is a bit of a break from the food I have been making. The inspiration for this project started from a conversation I had with Mia before she went to daycare yesterday.

"Mum can you please make me a Pepa Pig mask today?" (Mia)


"I guess so" (Me) "Yes I am sure that I can" (as I realised that this could potentially be quite a fun project!)

Pretending to be an animal is big with Mia at the moment. We have Whiskers the cat, Wuffy the dog and most recently the whole family has to pretend to be Pepa Pig's family. This latest role play was inspired by her being plonked in front of youtube watching Pepa Pig clips while Nathan "babysat" while the All Blacks were playing. Nathan thinks Daddy Pig is hilarious (he is actually, completely clueless as many father cartoon figures are) so plays along with it. Ellie has to be her little brother George and pretend to be obsessed with dinosaurs (as much as a 7 month old can pretend) and I have to be Mummy Pig who sorts out all Daddy Pig's mistakes (quite like real life really!)

So while Mia was at daycare and Ellie asleep I decided to make each of these 3 characters a mask.

Pig mask

You will need: Pink felt, elastic, pink thread, black felt

These are the pieces you will need to cut out: Front and back mask panels, nose and 2 ears (from pink) and 2 black nostrils


Sew nostrils to the nose. Sew the ears onto the front of the back mask panel.


Cut elastic to fit around the child's head. Sew ends of elastic to front of back mask panel.


Top stitch the 2 mask panels together around the edges. Top stitch the nose onto the mask. You can also top stitch around the edges of the ears if you like.


Here's Pepa:


Cat mask


You will need: Black felt, pink felt, elastic, black thread


Cut out: 2 mask panels and 2 ears from black felt, a pink nose.


Follow exactly the same process as you did with the pig mask.


Dog Mask


You will need: Brown felt, elastic, brown thread, black felt


Cut out: 2 mask panels, 2 ears from brown felt. Black nose.


Follow exactly the same process as you did with the pig mask.


Wuffy the dog:

Thursday, September 22, 2011

Summer Tank Top Tutorial


After trial and error (this started off as a top for me, but I made it too big, then too small, then it became a top for Mia!) I have figured out a tutorial for this top that works for child or adult! So here goes:

You will need:
A metre of fabric for an adult, less for a child
Matching thread
1cm wide elastic

1. Measure whoever the top is for. You will need 2 measurements. Around the hips and from underarm to hip.

2. Cut out your fabric. You will need 2 squares that measure

Half of hip measurement plus 10cms (child) or 20 cms (adult) and measurement from underarm to hip plus 5cms

e.g: If you are making it for a child that is 64cms around the hip and 30cms from underarm to hip, each of your squares (or rectangles if you want to be picky) will be 42cm x 35cms.

You will also need 2 straps that are 4cms by enough length to hold the top up.

3. Sew your 2 squares together, right sides together, on both sides.

4. Fold under and press 2cms at the bottom (hem) and 3cms at the top (for elastic). You will either need to overlock edges to stop fraying or fold under a little bit so raw edge isn't exposed.

5. Sew these, leaving a gap in the top to insert elastic.

6. Put elastic around chest under arms and cut so that it is firm but not so tight it is uncomfortable.

7. Insert elastic and stitch ends together and stitch where you have inserted it closed.

8. Overlock edges of straps. Fold in 3, press, and top stitch to hold it together. Pin these to underside of top in correct place to hold top up, with overlocked edges to bottom. Stitch 2 lines of stitching on either end of both straps to hold it in place.


All done! Wasn't that easy! Now wait for some sun to wear it in!

Wednesday, September 21, 2011

Summer Outfit


With summer approaching I am trying to make some cute outfits for my girls. Today I produced this. I am pretty happy with it, as is Miss Mia. Even though it is freezing she refuses to take it off!

With the shorts I used a pattern from an Ottobre, a very basic pair of shorts and modified it using this tutorial . The top I made up myself, tutorial following. It was very simple, showcasing the cute fabric that I got in a Spotlight sale. The whole outfit was very simple to make.


Now we need some nice weather so she can wear it outside of the lounge with the heatpump on!

Saturday, July 16, 2011

Art Case


While wasting time on pinterest, I came across some pictures of art folders for kids and thought "what a great gift". I played around with a proto-type for Mia, and improved on it from there. I think this will be one of my "go to" presents for kiddlies for the next year or so until they have one each! Here is how I made it. You will need:


  • 2 fabrics (for inside and outside and pockets) it is a good idea to use at least one that is quite stiff eg: denium. Alternatively you could iron on interfacing to stiffen it

  • velcro

  • Double sided iron on stuff (forgot what it was called) for applique on front

  • Thread and a machine etc


What you need to cut out:


  • A piece from each type of fabric measuring 35 x 60cms (interior and exterior)


  • 2 handles measuring 25 x 10cms


  • 1 pocket measuring 35 x 22cms from exterior fabric


  • 1 pocket measuring 35 x 15cms from exterior fabric


  • 1 pocket measuring 35 x 15cms from interior fabric

Iron them all to make them nice and flat.


How to make it:


  1. Work out half way both vertically and horizontally so you put the applique in the right place (I learnt from my first try!) Adhere whatever applique you choose to use to the front of the exterior piece of fabric. Sew it on.


  2. Fold a cm under each long side of each pocket and iron. Hem one ironed side of each.


  3. Work out half way of the interior (the bit that will fold it into a suitcase) so that you put the pockets in the correct place. Stitch the exterior fabric smaller pocket to one side of the interior. Stitch close to the side, as this is just basting and will hold the pocket in place until you sew the interior and exterior together. Sew lines on this pocket, to make "mini-pockets" to put crayons and other treasures in.


  4. Place the 2 remaining pockets together, with the smaller pocket on top of the larger one. Overlap the ironed under bit at the bottom. Sew this onto the other side of the interior fabric, very close to the centre line.


  5. Sew the long side of the handles, and turn them the right way out. Iron these. You can top stitch them close to the edges if you want to make it look pretty.


  6. Pin the exterior and interiors together, right sides together. Also pin the handles on, making sure that they are sandwiched between the two layers and pointing inwards. Make sure you centre the handles (again learnt the hard way!) Sew right around the outside, leaving a small hole between the 2 ends of one handle so you can turn it the right way out.


  7. Turn your art case the right way out.


  8. Sew right around the outside of the whole case, close to the edge to make it look nice! Also sew along the "fold" where the case will close.


  9. Sew on 3 8cm pieces of velcro on each inside edge, on either end and in the middle. Be very careful to ensure that these match so that the case can be closed.


  10. Fill it with crayons and some paper or a colouring book and you have a gift!

Thursday, June 9, 2011

Man's shirt to girl's dress: Finishing

So once my dress looked like a dress I added some finishing touches.


1. I put bias binding around the neck. Obviously you can buy this, but it is pretty easy to make. MADE has a tutorial. You can also find how to put it on in this blog too.


2. I put material around the waist to run a ribbon through. I got M to put it on so I could mark her waist, I then got a strip of material 6cms wide (4cms for the ribbon and 1cm to fold under on each side). I ironed 1cm under on each side and then pinned it onto the dress. Don't forget to pin it on with the buttons done up so that you can work out where to finish so that you can tie the ribbon. I didn't the first time and my band went under the button strip so I couldn't do it in a bow and I had to do some unpicking.


3. Stitch the band on close to the edges.


4. Run some ribbon through by putting a safety pin on one end and feeding it through.


5. Hem it. I folded 1 cm under and ironed, then 2cms and ironed again to make a neat non-frayable edge.


I am very proud of the end result, even if it is very summery and its wet and cold here!

Girl's dress from Men's shirt - sewing together

So once I had my dress pieces I had to sew them together. It was pretty simple. This is what I did:

1. Stitch the front and back together at the shoulders, right sides together, using zig zag.


2. Sew large straight stitches in the top and bottom of the sleeves, which I used to gather them.


    3. Gather the top of the sleeves to fit the arm holes and sew them on, right sides together using zig zag.


    4. Cut straight bands to fit around M's arms from the sleeves. Make sure they aren't too tight! I then ironed these in half and gathered the bottom of the sleeves to fit the bands and stitched them together using zig zag again. Give them an iron so they look good.


    5. Stitch up the sides and the bottom of the sleeves using zig zag.


    6. All joined together, now you just need to add the finishing touches!!


Wednesday, June 8, 2011

Upcycling men's dress shirt to girl's dress: Step 1 making a pattern

I am very proud of myself! I have made a pattern and a dress from scratch! And I think it looks pretty good! I got a large part of my inspiration from 2 blogs that I love, MADE and Craftiness is not optional. I will not be afraid to try this kind of thing again!


1: Get a man's dress shirt. I bought a really large one with nice purple and blue stripes from an op shop.


2: Make a pattern. I used a T-shirt of M's to trace around to create the bodice and then continued it down to make a dress. I made it way too long and had to trim the dress a lot! I made the front neck dip down and the back quite straight. I also made sure I added a 1 cm seam allowance and about 3cms for the hem I then made the sleeves, making them a bit too wide for the dip in my bodice so that I could gather them a bit.


3: Cut it out. I cut the sleeves from the sleeves of the shirt, the back from the back, and the front from the front, preserving the buttons because putting my own on would be way too much like hard work!!


Sunday, May 15, 2011

Ric-rac and ruffle T-shirts


Here are T-shirts 3 and 4. I sewed ric-rac onto 1, it was supposed to be for M but it ended up being too small so will put that one aside for a gift. With the other I cut thin strips of fabric and ran wide stitching up the middle and gathered it. I left the edges frayed for a rock star look and stitched them down the centre onto the T-shirt. I then un-did the original running stitch. Not sure how long the ruffles will survive the washing machine, but they look cool for now!

Friday, May 13, 2011

Mia's Flower T-shirt


OK this one is a bit of a cheat as I had already made the badge, but the singlet I made it for is too small for M so I decided to re-use it for one of my 5 T-shirts. The reason I put this on a safety pin badge is because it is hand sewn and has raw edges so wouldn't successfully survive the washing machine, so this way you can detach the badge and watch the T-shirt. All I did was get a strip of material and put handsewn running stitch through one edge and tighten it to make the material curl up then tie a knot. I then sewed the button on the front and a safety pin on the back. There are lots of tutorials on the net to make flowers of various sorts. Here are some:


Do a search and you will find a lot more!