Thursday, June 30, 2011

DIY nappies and wipes

When I had my first daughter I was determined to use cloth nappies. As well as being environmentally friendly, I was sold on the fact that after an initial outlay of money, it would save me lots on my weekly grocery bill not having to use disposable nappies. So many people dismiss using washable nappies by forming images in their heads of hours spent slaving over washing them, when the reality is you chuck them in a bucket to soak and then chuck them in the washing machine. When the child gets older and the number 2s get a bit larger and more solid you can add a flushable liner so that you can just empty any poos down the toilet. It really is very easy.

Most people I talked to (and myself now) prefer pocket nappies. What these are are an outside waterproof "case" or cover that you slide a pad into to absorb all the waste. Pocket nappies are probably the most expensive re-useable nappies to buy, so when my sister had her baby I decided that I was proficient enough in sewing machine use to create her some homemade pocket nappies. I have since added to our mutual nappy collection by making some more of my own. They work just as well as the bought ones and cost about a third to a quarter of the cost (although having said that I bought my original ones from the US and our dollar is very strong at the moment so wouldn't be as expensive!). They are pretty easy to sew, especially if you have an overlocker to go around the edges of the liners and stop them fraying.

There are 2 websites that are invaluable if you want to make your own nappies:


  • The nappy network: This has advice on both buying cloth nappies and DIY. It even has some free patterns. My first attempt of homemade nappies were the Wee Weka pocket nappy. I used velcro, which tends to stick to everything. Also I found the pattern quite small, especially for my gigantic nephew! For my second attempt I purchased a cosy bundles pattern which can adjust to fit a huge range of sized babies, and my cousin and I went halvies in a stud press, which meant we could put domes on the nappies which don't get covered in fluff like velcro.

  • Greenbeans. This is where you can purchase everything that you need to make the nappies, including our friend the stud press (also very useful for quickly putting snaps on kids clothing!)

I would highly recommend having a go at making your own, even if you have to con a friend or relative into giving you a hand.


The other thing that you can spend copius amounts of money on when you have a baby in the house are wipes. And most of them are not supposed to be flushed down the toilet, so your choices are either put them in the bin (ew) or clog up the loo! With a bit of experiementing I have discovered 2 ways that you can save on money, although one of them doesn't really reduce the number of paper wipes that have to find somewhere to go after being used!


First is the mix for the wipes. After experimentation and reading a variety of recipes for wipe solution you have quite a few options that work. Basically you need to take about 2 cups of boiled water and add to it a couple of tablespoons of any of the following: rosewater, castile soap, witch-hazel and a nice oil such as almond or calendula e.g: Add 1 T castile soal and 1 T of almond oil. You can also add a few drops of essential oils such as teatree for its antiseptic properties and lavender for its nice smell!


You then have 2 options. You can dip clean cloths in this mixture and squeeze out excess liquid (I keep it in a sealed icecream container) and wipe. I use a mix of homemade wipes made from flannel or velour. You can then soak and wash these with the nappies. Your other option is to get a container (icecream would work again, or a plastic huggies container is perfect!) and to place about 10 paper towels (chopped up to wipe size), pour on a little liquid, 10 more wipes, bit more liquid and so on. This makes wipes that are much cheaper than commercially produced ones, contain less crap, although are not as soft! You may need to experiment with the type of wipe. I find the homebrand ones from woolworths work fine.


2 ways to save money with a baby in the house, I dare you to try one!

Thursday, June 23, 2011

Your local library

Mia and I went to the library on Wednesday afternoon, a not uncommon occurance, although she usually goes with her Dad. After checking out the sewing section I decided that they didn't have enough recently published sewing books. I suggested that they buy 3 books I have been wanting to test for a while. The librarian said they are always on the look out for books to buy and would purchase all 3 and give me first go with them! Sweet! You should try the same with your own local library! You've got nothing to lose!!

The three books I requested were:

Carefree clothes for Girls by Junko Okawa

Weekend Sewing by Heather Ross

Growing up Sew Liberated by Meg McElwee

Now I just need to get them to stock Burda Magazines!!

Mia's 3rd Birthday - cake and butterfly wings

Last Saturday we had a party for Mia who turned 3 on the 13th. We had a house-full of pre-schoolers dressed up as animals. M at 1st wanted to be a Tiger but then decided on being a butterfly with a Tiger cake!


Her daycare has some great costumes, including some monarch butterfly wings that she is pretty fond of. I borrowed the wings and cut a shape out from an old very light knit scarf. I overlocked around the edges to stop it fraying and put elastic so that they would go around her shoulders and wrists. It was actually pretty easy! M and I got some puffy fabric pants from the Warehouse and decorated the wings. Mia didn't really get moving the pen while squeezing it, leaving piles of puffy paint that would never have dried! I modified these into "smears" of paint. Ok it wasn't as beautiful as the original monarch butterfly wings, but she had fun doing it!!! We also made some antennae from a headband, some pipecleaners and some foam shapes with holes stuck on the end of the pipecleaners. Here is the final result:


I also got to make another cool cake - a Tiger, which I was pretty happy with. Again no horrible tasting fondant, just yummy and less perfect buttercream!!


Sunday, June 19, 2011

Make your own cleaning products

This is something I have dabbled in for a while, but has fallen off the wayside a bit since the arrival of Miss E. A few nights of enough sleep and reading A Home Companion: My year of living like my grandmother by Wendyl Nissen, a present from a friend for my birthday, has inspired me to get back into it.

As well as sewing I am keen to become more self-sufficient in other areas, for many reasons including self satisfaction, saving money and helping our planet out a bit. This week I am going to focus on making my own cleaning products. Check out Wendyl's website it has some recipes for products that she has tried and tested. I am going to try them out too. I also have a few other recipes I have used in the past:

Jif
Mix baking soda with enough liquid detergent or castille soap to make a paste. Add teatree oil and lemon oil (a few drops of each) to make it antiseptic and smell nice. This goes hard like rock pretty quickly if you don't use it up, but apparently a bit of glycerine keeps it soft. I am going to try this. It works really well!

Disinfectant
I use a mixture of white vinegar and teatree oil to clean the toilets. Together they kill pretty much all the germs. I use ecostore toilet cleaner for the bowl though as the only alternative I have found is a mixture of (a lot of) vinegar and baking soda which actually ends up costing more!

Cleaning spray
I use Dr Bronner's liquid castile soap for my cleaning products. Its quite expensive but it lasts for ages. This cleaning spray works well, although it does leave a build up after a while. I think that Vinegar would remove this though:

1. Mix 1/4 c white vinegar and 1 t borax (can get this from chemist) in a spray bottle.
2. Fill most of the bottle with very hot water from the tap. Shake to dissolve the borax.
3. Add 1/4 c liquid soap and shake.
4. Add 10 - 15 drops of essential oil.

Window Cleaner
Mix half vinegar and half water. Works on mirrors too. Apparently a little bit of cornflour stops streaking but I haven't tried that yet.

Have a go at making your own and share your recipes!! I will share any I try over the week.

Tuesday, June 14, 2011

Pinterest

Thanks to my friend Susan for telling me about Pinterest - basically its an online collage you can create of pictures that inspire you, and the pictures link to the original websites. I have been having lots of fun creating (aka wasting time!) making a collage of things that I would love to sew! Not sure if the link will work without you being a member of pinterest, but here is my collage.

Make one of your own if you are like me and far too tired to sew!

P.S: I wish you had time to play at making collages Sus rather than cleaning up silt in your garden. Poor, poor Christchurch residents it really is time you all had a turn at some good luck!!

Thursday, June 9, 2011

Man's shirt to girl's dress: Finishing

So once my dress looked like a dress I added some finishing touches.


1. I put bias binding around the neck. Obviously you can buy this, but it is pretty easy to make. MADE has a tutorial. You can also find how to put it on in this blog too.


2. I put material around the waist to run a ribbon through. I got M to put it on so I could mark her waist, I then got a strip of material 6cms wide (4cms for the ribbon and 1cm to fold under on each side). I ironed 1cm under on each side and then pinned it onto the dress. Don't forget to pin it on with the buttons done up so that you can work out where to finish so that you can tie the ribbon. I didn't the first time and my band went under the button strip so I couldn't do it in a bow and I had to do some unpicking.


3. Stitch the band on close to the edges.


4. Run some ribbon through by putting a safety pin on one end and feeding it through.


5. Hem it. I folded 1 cm under and ironed, then 2cms and ironed again to make a neat non-frayable edge.


I am very proud of the end result, even if it is very summery and its wet and cold here!

Girl's dress from Men's shirt - sewing together

So once I had my dress pieces I had to sew them together. It was pretty simple. This is what I did:

1. Stitch the front and back together at the shoulders, right sides together, using zig zag.


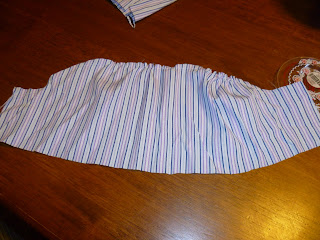
2. Sew large straight stitches in the top and bottom of the sleeves, which I used to gather them.


    3. Gather the top of the sleeves to fit the arm holes and sew them on, right sides together using zig zag.


    4. Cut straight bands to fit around M's arms from the sleeves. Make sure they aren't too tight! I then ironed these in half and gathered the bottom of the sleeves to fit the bands and stitched them together using zig zag again. Give them an iron so they look good.


    5. Stitch up the sides and the bottom of the sleeves using zig zag.


    6. All joined together, now you just need to add the finishing touches!!


Wednesday, June 8, 2011

Upcycling men's dress shirt to girl's dress: Step 1 making a pattern

I am very proud of myself! I have made a pattern and a dress from scratch! And I think it looks pretty good! I got a large part of my inspiration from 2 blogs that I love, MADE and Craftiness is not optional. I will not be afraid to try this kind of thing again!


1: Get a man's dress shirt. I bought a really large one with nice purple and blue stripes from an op shop.


2: Make a pattern. I used a T-shirt of M's to trace around to create the bodice and then continued it down to make a dress. I made it way too long and had to trim the dress a lot! I made the front neck dip down and the back quite straight. I also made sure I added a 1 cm seam allowance and about 3cms for the hem I then made the sleeves, making them a bit too wide for the dip in my bodice so that I could gather them a bit.


3: Cut it out. I cut the sleeves from the sleeves of the shirt, the back from the back, and the front from the front, preserving the buttons because putting my own on would be way too much like hard work!!


Real Biscuits! (Not playdough!)


I have probably mentioned before that baking is one of my dearest childhood memories. M loves to play cutting out "biscuits" in playdough so I promised her that we would make some real biscuits using biscuit dough and then icing and decorations. She cut them out using cookie cutters and then I got a whole range of decorations and icings and we went to town! Needless to say she lost interest before me!


Friday, June 3, 2011

Birthday Season!


I haven't posted much in the last couple of weeks due to a trip north to see my parents. I had visions of getting sewing done, and even took some with me but as I had to look after the girls each day while they were at work, pretty much nothing got done. Also Miss E has taken to doing a lot of waking during the night, which means I have to use nap time for naps rather than crafts! I am working on matching tops for M, myself and her doll, but they are still a work in progress!


While away, Mum gave me a stack of her old fabric so I am excited about using that. I also created some felt finger puppets and patterns, but again those are a work in progress and not ready to be reported on yet!


M turns 3 in just over a week! Because obviously her antenatal (boy) friends all turn 3 at around the same time, and I happen to have friends with kids who are pretty much exactly a year and two years older, it is big time birthdya season. We have birthday parties every weekend except 1 for 8 weeks! In lieu of a present my friend Mel asked me to make her big 5 year old boy a birthday cake, which we were both stoked about as I love making birthday cakes, and she hates it! I hate the polished creations of this day and age with their fondant (which I think tastes like c**p!). I am an avid fan of the 1980s Women's Weekly Cake Book that my mother had when we were kids. I remember choosing a cake every birthday and it would magically appear in the cabinet in the lounge to be stared at until the candles were lit and the cake devoured at the end of the part. I love this book so much I even paid pretty much full price for a second hand copy (in very good condition!). I am continuing the tradition of letting my little girls choose a cake each birthday.


Anyway, B wanted to have a Pirate Birthday Party for his 5th, and wanted me to create a skull and cross bones cake. Again I was excited as this was about as boyish as you can get and with 2 girls, I can't see me having too many opportunities for such masculine cakes! There isn't one in the cake book so I made up my own. I think it looked great, although I had to add some extra milky bar to the sides as it was a bit lacking in lollies!!


Mia's party is in 2 weeks, can't wait to create her Tiger cake!